
Form & Technique
Pushup Elbow Lockout at the Top: Form & Safety
Discover how to perform a pushup elbow lockout at the top safely, with elbow angles, ROM, and cues for proper form and core stability.


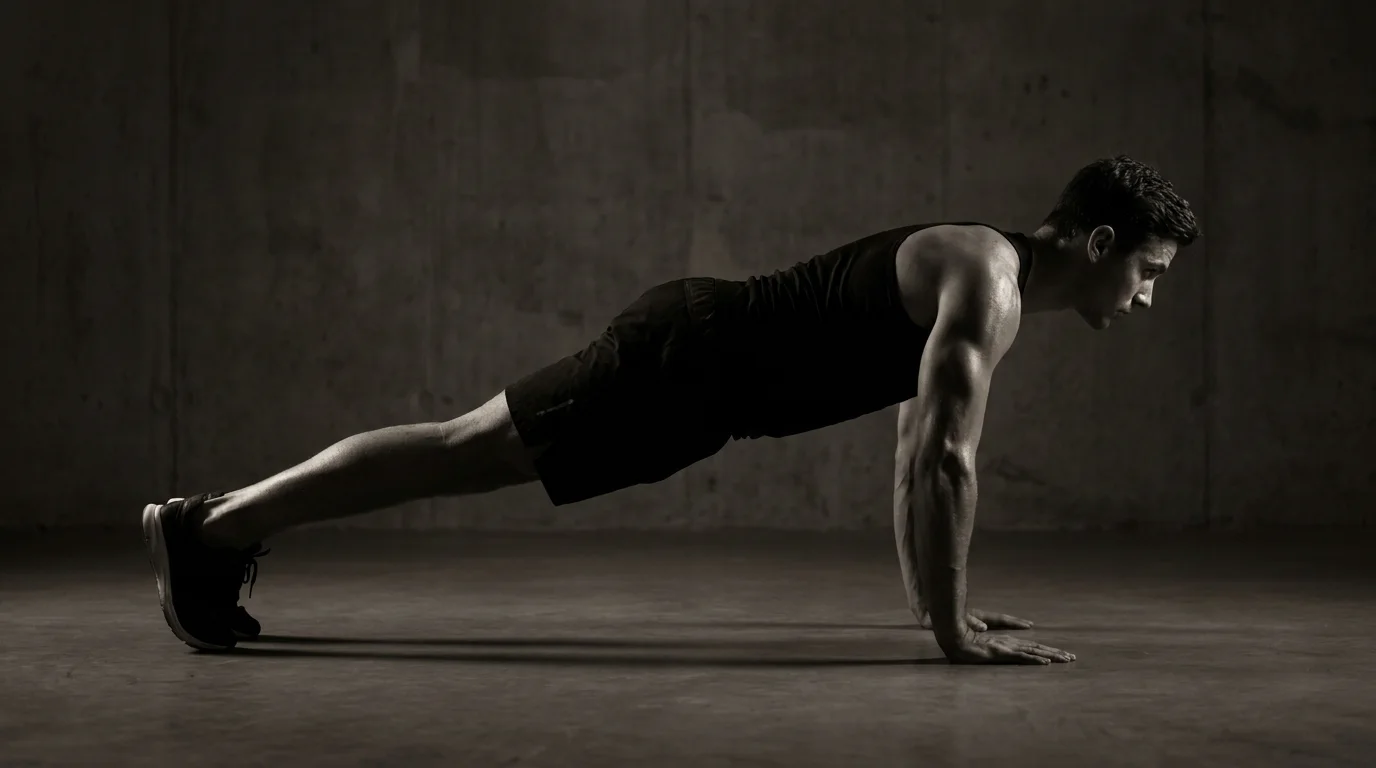
Top-Lockout mechanics: elbow position, scapular stability, and alignment
With the pushup elbow lockout at the top, a clean top position helps align the wrists, elbows, and shoulders and supports core stiffness. Locking out can boost triceps drive and define the finish, but it also increases load on the elbows and may invite rib flare or lumbar compensation if the core or scapular control slips. The goal is a stable top position you can hold briefly with a neutral spine and solid scapular stabilization before returning to depth.
Elbow angle options: 45° vs full extension
- The push-up elbow angle 45 degrees keeps elbows nearer the sides, reducing elbow stress and helping you stay stable as you press.
- Full extension increases triceps recruitment and produces a crisp finish, but can stress the elbow and shoulder if the core or scapular control falters.
Scapular positioning and neutral spine during top lockout
- Retract and depress the scapula so they sit over the rib cage, supporting scapular stabilization.
- Maintain a neutral spine from head to hips; avoid sagging or excessive arching.
- Keep the neck long with a forward gaze to support alignment.
Anti-rotation and bracing cues for top-lockout
- Brace the core as if about to be punched; tighten the glutes and thighs.
- Drive evenly into the floor with both hands; keep hips square to the floor.
- End each rep with a controlled breath, then reset if rotation slips.
Safety, progression, and shoulder health: ROM, bracing, and lockout variations
ROM limits and safe progression
Top lockout means arms are straight but not forced into hyperextension. Stop if you feel joint pain; stay in a pain-free range. For push-up depth proper depth, start with elevated push-ups and progress to floor depth only after top control is solid. Build ROM gradually and only advance when the top position feels solid and stable.
Tempo and isometrics for top-lockout
Use a controlled tempo: lower 2 to 3 seconds, press up 1 to 2 seconds, brief top hold of 1 to 2 seconds. Isometrics help cartilages adapt, so hold the top for 3 seconds between reps. Eccentrics count too: lower slowly from top over 4 to 6 seconds to the bottom.
Bracing and anti-rotation cues
Brace the core and glutes, ribs down, avoid sagging. Press evenly through both hands, keep elbows under shoulders, and avoid twisting the torso. Anti-rotation cue: think of pressing the floor with both hands and keeping hips square.
Practical guidelines for perfect push-ups: hand width, depth, and readiness assessments
Assessing readiness for top-lockout
- Top-hold test on the floor with elbows fully extended for 5 seconds. Brace core and glutes, keep ribs quiet. If the brace collapses, regress to an incline and retry.
- Do 2 reps with a brief pause at the top to check control through the upper back and neck. During the reps, ensure you hit proper depth by lowering until your chest is near the floor while keeping your torso tight and hips from sagging.
- If you feel pain or instability, back off. These checks gauge your top-lockout readiness.
Hand width and elbow alignment guidelines
- Start with hands about shoulder width apart or slightly wider. Think of the best hand width and elbow alignment for push-ups as roughly shoulder width, or slightly wider. If shoulders pinch, move hands in.
- At the top, the top position elbow should be straight and align under the shoulder, with elbows tracking near your torso at about a 45-degree angle to your body.
Progressions: tempo, isometrics, eccentrics, and top holds
- Tempo: slow descent, pause as you near the bottom or just above it, then press up.
- Isometrics and top holds: hold top for 5 seconds, 2-3 sets.
- Eccentrics: lower slowly to halfway, then push up with control.
- Start on incline push-ups to build top-lockout readiness and progress to standard, then add decline for extra challenge.
Frequently asked questions
Should you lock out elbows at the top of a push-up?
Not necessary to force full lockout. Aim for a stable top with a small bend, elbows tracking toward the midline, and a brief top hold to check control.
What is the recommended elbow angle during a push-up?
Two common options: about 45 degrees with elbows closer to the body reduces elbow stress and helps stability; full extension increases triceps drive but may stress joints if control slips.
How deep should a push-up go for best chest activation?
Lower until your chest is near the floor while maintaining a braced core and scapular control.
How can I progress push-ups safely (incline to standard to decline)?
Start with incline or wall push-ups to emphasize the top position, then progress to a knee push-up with a controlled top before attempting a full push-up lockout.
About the authors

Goran Huskić
Co-founder · Professional basketball player
Goran Huskić is a Serbian professional basketball player — a 6'11" center currently playing for Monbus Obradoiro in Spain's Primera FEB. He won the 2019–20 Basketball Champions League with San Pablo Burgos and has competed professionally across Spain, Germany, Lithuania, Serbia and the United States. He co-founded PUSHapp to bring pro-level training discipline to everyday workouts.
Nikola Janković
Co-founder · Former professional basketball player
Nikola Janković is a former professional basketball player — a 6'9" forward and the 2016–17 ABA League MVP — who played for Partizan, Union Olimpija and Mega, among others. Today he runs a pilates studio and gym focused on strength, mobility and overall wellbeing. He co-founded PUSHapp to make consistent, measurable training simple for everyone.