
Form & Technique
How to Film Pushup Form From the Side: Side-View Tips
Learn how to film pushup form from the side to accurately assess alignment, depth, and tempo for self-check or coaching.


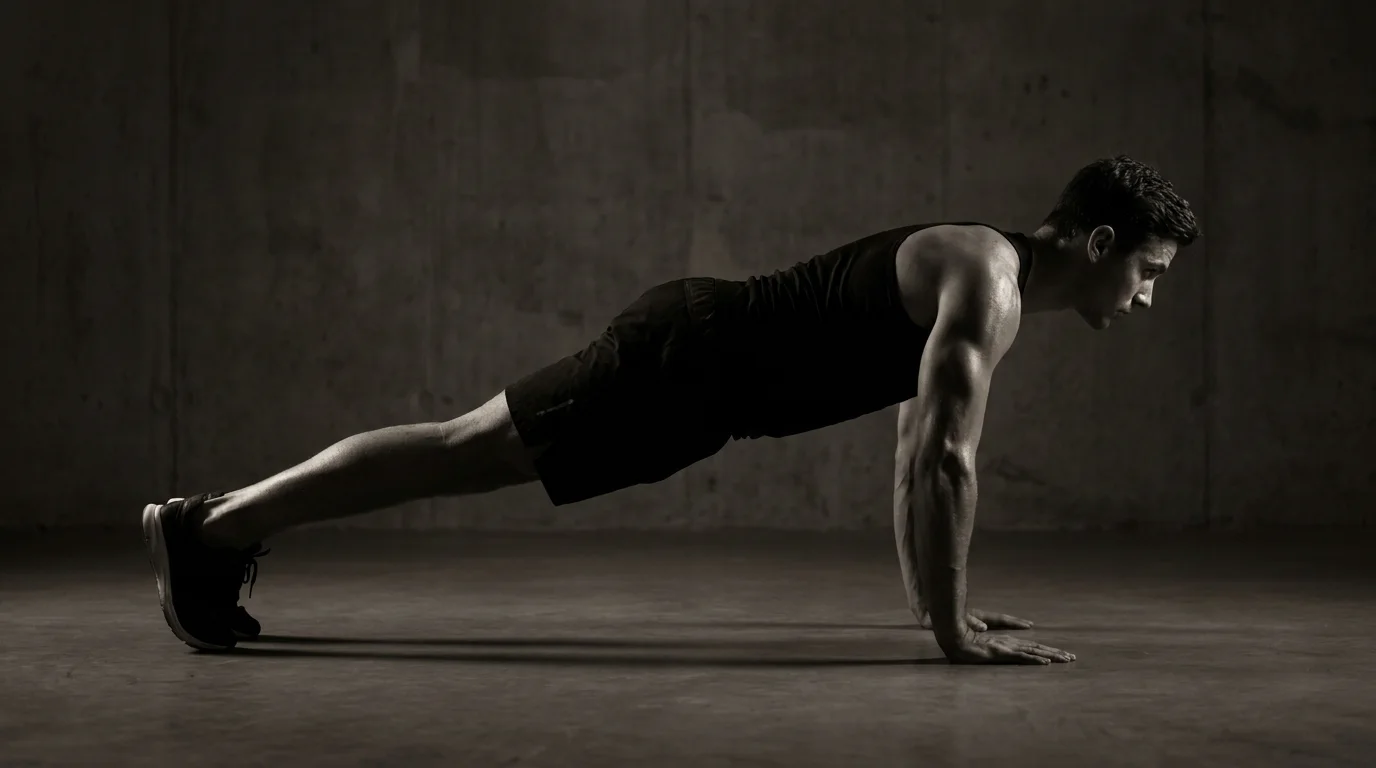
Section 1: equipment, setup, and framing for a clear side view of push-ups
Equipment and camera options
- Use a smartphone or dedicated camera. For smoother motion, shoot at 60 fps if you can, or 30 fps otherwise. If you need to crop later, 4K helps but 1080p is fine.
- Use a tripod, monopod, or stable surface. Clean the lens. Shoot in landscape orientation to capture more of the body.
Stability, distance, and framing
- Place the camera 1.5 to 2.5 meters away, depending on your space, so you see head to heels.
- Height: set the lens roughly at chest level so the torso stays in profile.
- Frame: show the full body and a clear shoulder/hip line.
Lighting and background
- Use even lighting, avoid strong backlight. If possible, shoot with natural light from the front or diffuse light sources.
- Choose a simple background without busy patterns that can distract.
Best practices to avoid shadows and distractions
- Clear clutter, secure cords, and test a quick 5 second run before the full set.
- Check for harsh shadows under the chin or along the midline and adjust light.
Section 2: capturing essential side-view cues: elbows, shoulders, and depth
Elbow angle, scapular position, and shoulder health
- Elbows move toward the midline rather than flaring out wide.
- Shoulder blades stay stable against the rib cage, without shrugging.
- The shoulder joint remains under control through the press.
Depth benchmarks
- At the bottom, the elbow often bends toward a 90 degree angle.
- The torso stays in a straight line; hips do not sag.
- The chest comes toward the floor without letting the midsection collapse.
Tempo, pause cues
- Use a steady pace down and up; avoid rushing reps.
- Briefly pause at the bottom to verify alignment before rising.
Wrist, spine, and core stability from the side
- Wrists stay stacked under the shoulders with a neutral position.
- The spine stays aligned from head to heels.
- Engage the core to keep the hips level.
Frame and camera setup
- Position the camera at chest height, parallel to the floor, wide enough to capture the whole side view. This framing helps you read elbow angle and scapular position reliably during push-ups.
Section 3: analyzing, benchmarking, and progressing push-ups from the side
Video-based benchmarks for depth, tempo, and pause cues
- Depth: the chest comes within a small distance of the floor while keeping a straight line from head to heels.
- Tempo: lower in a controlled, steady cadence, pause briefly at the bottom before pressing back up.
- Pause cues: use a momentary hold at the bottom to verify stability.
- If you are learning how to film pushup form from the side, these benchmarks give you clear targets for your side view.
Coaching cues, feedback, and progression paths
- Elbows track at about 45 to 60 degrees from the torso for the side view push-up form.
- Maintain a strong core and neutral hips; avoid sagging or piking.
- Progression options: start on an elevated surface, then move to standard push-ups, then to full depth.
Enhancing assessment with additional angles and future steps
- If you are practicing how to film fitness form checks, start with these side angles.
- Add a top view or front view if depth or symmetry is unclear.
- Keep a short archive of push-up form from side video to monitor progress.
Frequently asked questions
What is the best distance and height to film a side-view push-up for a form check?
Place the camera about 1.5 to 2.5 meters away and at chest height so the frame runs from head to heels, with the torso in profile and the lens parallel to the floor.
Should I film push-ups in landscape or portrait for coaching feedback?
Film in landscape orientation to capture the full side view and body in profile.
What should be included in the frame to accurately assess push-up form such as hips, wrists, elbows, knees, and feet?
Show the full body with a clear shoulder to hip line, wrists stacked under the shoulders, and a straight spine from head to heels.
Why is a side view preferred over a front view for evaluating push-up form?
The side view makes depth, shoulder reach, and hip alignment easier to read, which helps verify torso position and core stability.
About the authors
Goran Huskić
Co-founder · Professional basketball player
Goran Huskić is a Serbian professional basketball player — a 6'11" center currently playing for Monbus Obradoiro in Spain's Primera FEB. He won the 2019–20 Basketball Champions League with San Pablo Burgos and has competed professionally across Spain, Germany, Lithuania, Serbia and the United States. He co-founded PUSHapp to bring pro-level training discipline to everyday workouts.
Nikola Janković
Co-founder · Former professional basketball player
Nikola Janković is a former professional basketball player — a 6'9" forward and the 2016–17 ABA League MVP — who played for Partizan, Union Olimpija and Mega, among others. Today he runs a pilates studio and gym focused on strength, mobility and overall wellbeing. He co-founded PUSHapp to make consistent, measurable training simple for everyone.