
Variations & Types
Plyometric Pushups: Technique & Variations
Learn plyometric pushups with step-by-step technique, benefits, mistakes, and variations to boost power and athletic performance.

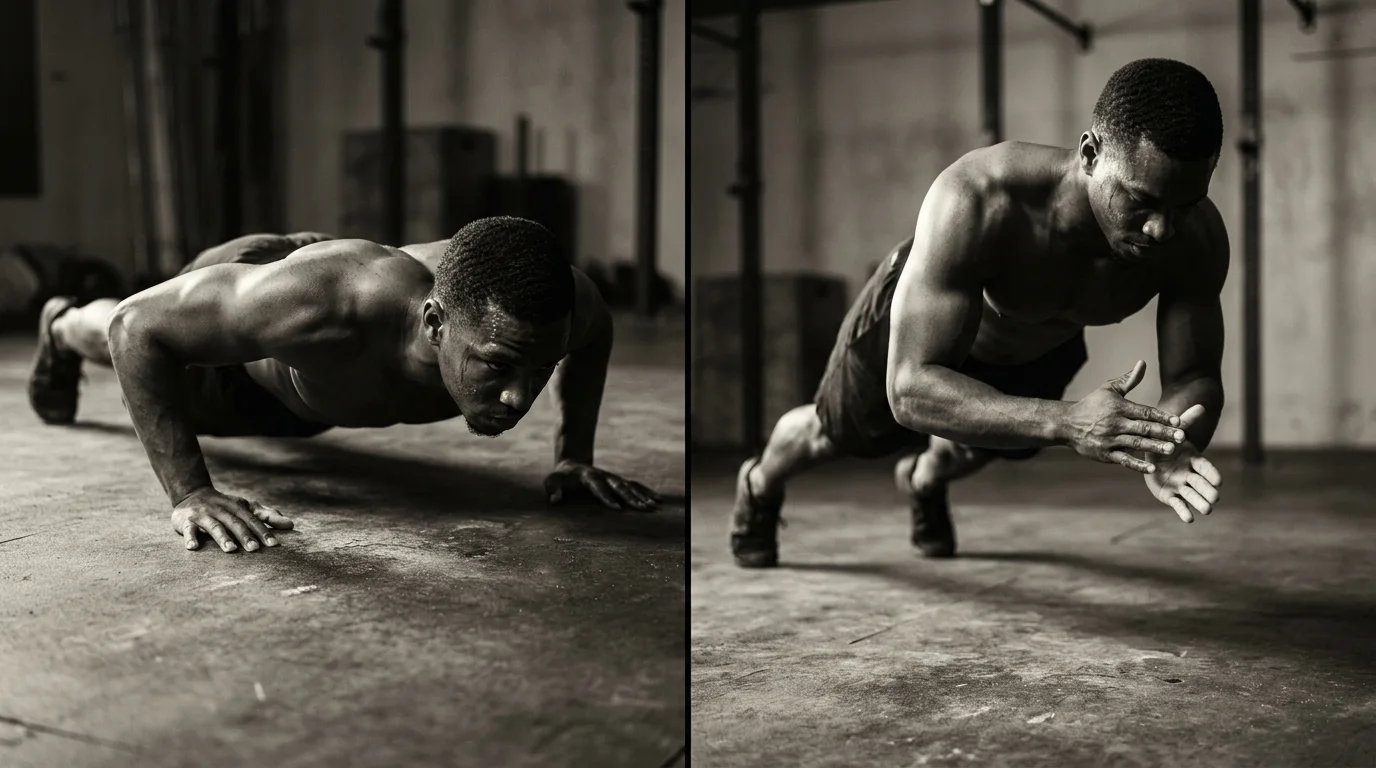
Technique deep dive: setup, phase timing, and landing mechanics
Setup and brace: positioning, scapular control, and trunk stiffness
- Place hands under shoulders, fingers spread, wrists neutral.
- Brace the core as if you are about to be punched, and tighten glutes to keep hips level.
- Set scapular control by drawing shoulder blades down and back while keeping the upper back stable.
Eccentric pre-stretch and amortization timing: loading mechanics and transition
- Lower with control, elbows tracking modestly outward and shoulders aligning with the hands.
- The eccentric pre-stretch loads chest and triceps, preparing for a stronger push.
- Minimize the amortization pause between descent and ascent to preserve momentum and rhythm.
Explosive phase and landing: achieving velocity while maintaining control
- From the bottom, drive through the floor and push the chest forward while maintaining a tight core.
- Keep hip stability and a solid brace as you rise.
- Land softly, absorb with the shoulders and wrists, then reset for the next rep.
Biomechanics and cues by variation: how joint angles and force curves shift
- Different variations shift joint angles and the force curve, changing where you feel the work and which cues dominate.
- If form breaks, adjust depth, tempo, or stance to keep hip stability and core brace intact.
Variations and biomechanical analysis: archer, clap, pike, and more
Variation overview: standard vs. archer vs. clap vs. pike
- Standard plyometric pushups use both hands under the shoulders with a quick push off the floor. Archer shifts load to one side with an extended arm, increasing unilateral demand. Clap adds a brief hand clap at the apex. Pike raises the hips to create a more vertical torso and shifts emphasis toward the shoulders.
Biomechanics by variation: force curves, joint angles, and muscle demand
- Standard: force peaks at takeoff and falls during landing; elbows bend to about 90 degrees at the bottom.
- Archer: the force curve skews toward the loaded side; core works harder to prevent rotation.
- Clap: faster ground contact and higher rate of force development; wrists, shoulders, and chest feel the surge.
- Pike: torso stays more vertical; hips drive shoulder demand and the moment arm lengthens.
Prerequisites and readiness criteria: how to progress safely
- Build from solid baseline pushups with controlled reps. Develop core bracing and comfortable shoulder stability. Only move to archer, clap, or pike after consistent, clean form on standard plyometric pushups.
Cues and common mistakes: keep momentum in check and protect the hips
- Cue: land softly with hips in line, ribs tucked, and hips not sagging. Avoid twisting in archer, dipping hips in clap, or letting the head lead in pike.
Programming guidelines: templates, safety, and sport transfer
prerequisites and readiness checks
- Baseline strength and control: a standard pushup with clean alignment for several reps, plus a brief bottom hold.
- Shoulder and wrist readiness: no pain or instability during pushing.
- Core stability: maintain a straight line in a hollow position for 20 to 30 seconds.
templates by goal: power, hypertrophy, and endurance progression
- Power: 3-5 sets of 3-6 plyometric pushups, move fast, rest 2-3 minutes between sets.
- Hypertrophy: 4-6 sets of 6-10 reps, steady tempo with solid landings, rest about 90 seconds.
- Endurance: 3-4 sets of 12-20 reps, steady pace, rest around 60 seconds.
progression schemes and tracking: when to advance or deload
- How many per workout to target: follow the template's rep range; advance when you hit the top end with clean form in two sessions.
- Deload criteria: signs of accumulating fatigue or joint soreness; reduce volume 30-50% for a week.
safety guidelines and injury risk: landing mechanics and fatigue cautions
- Land softly with knees slightly bent, hips neutral, core braced.
- Stop if pain or form breaks; pace and volume matter more than volume.
integration with broader power development: sport-specific transfer data
- Pair plyometric pushups with sport tasks and a light recovery week to promote transfer. Test a sport-specific drill at the end of week four and adjust the next block based on the result.
Frequently asked questions
What are the steps to perform a plyometric push-up?
Set your hands under your shoulders, brace the core and glutes, lower with control until the chest is just above the floor, then explode upward into a light jump. Land softly with knees bent, absorb the load, and reset for the next rep.
Are plyometric push-ups suitable for beginners?
Yes, but start with easier progressions such as incline or knee-based explosive pushups to learn the pattern, then advance only after solid form. Plan two to three sessions per week and focus on rep quality and safe landing.
How should I progress plyometric push-ups safely?
Begin with incline or knee-based variants, then move to flat surface reps with a controlled jump as form allows, and only advance to more demanding versions when technique and power improve. Plan two to three sessions per week and increase volume gradually while prioritizing rep quality and safe landing. If form breaks or you feel pain, back off and revisit the basics.
Which plyometric push-up variation is best to start with?
Start with incline or knee-based explosive pushups to learn the pattern without heavy loading, then progress to flat surface reps with a controlled jump before attempting archer, clap, or pike variations.
About the authors

Goran Huskić
Co-founder · Professional basketball player
Goran Huskić is a Serbian professional basketball player — a 6'11" center currently playing for Monbus Obradoiro in Spain's Primera FEB. He won the 2019–20 Basketball Champions League with San Pablo Burgos and has competed professionally across Spain, Germany, Lithuania, Serbia and the United States. He co-founded PUSHapp to bring pro-level training discipline to everyday workouts.
Nikola Janković
Co-founder · Former professional basketball player
Nikola Janković is a former professional basketball player — a 6'9" forward and the 2016–17 ABA League MVP — who played for Partizan, Union Olimpija and Mega, among others. Today he runs a pilates studio and gym focused on strength, mobility and overall wellbeing. He co-founded PUSHapp to make consistent, measurable training simple for everyone.