Variations & Types
Fingertip Pushups: Techniques, Benefits, and Progressions
Discover fingertip pushups with step-by-step technique, benefits for grip and forearm strength, safety tips, and progression from beginner to advanced.
Mastering Fingertip Pushups: Technique, Setup, and Common Mistakes
Step-by-step Technique
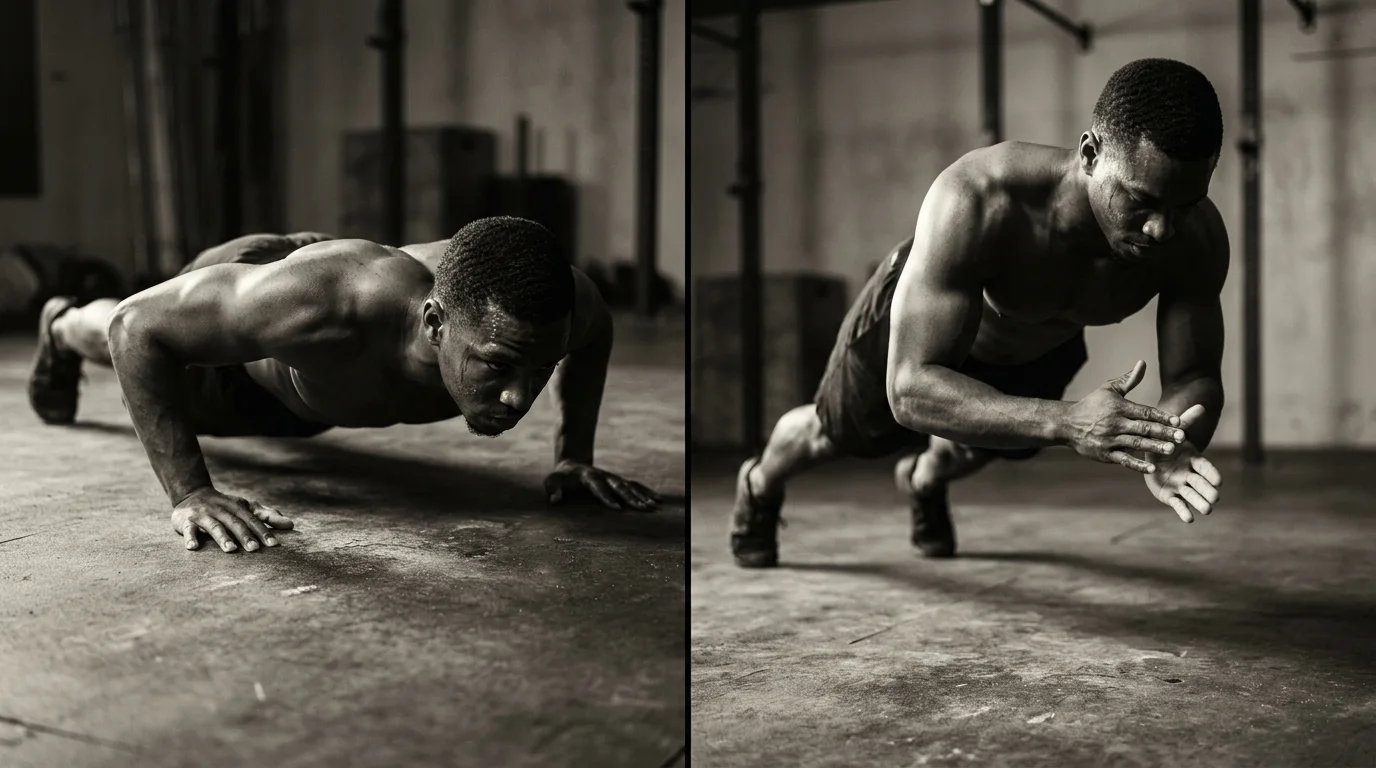
If you're learning how to perform fingertip pushups step by step, start with a tall spine, brace your core, and look slightly ahead. Place fingertips on the floor, evenly spaced about shoulder-width; press into the pads of the index and middle fingers. Keep wrists neutral, forearms vertical under shoulders. Elbows tucked ~45 degrees; lower with control until the chest hovers above the floor. Push through the fingertips to return to start.
Hand and Finger Placement
Distribute weight across fingertip pads, not the base of the palms. Spread fingers for stability; keep thumbs relaxed and relaxed grip.
Wrist Alignment and Load Distribution
Maintain neutral wrists with load through the fingertips and forearms. Let the wrists stay stacked over the fingers as you press up.
Common Mistakes and Fixes
Hips sag: brace the core and glutes. Elbows flare: narrow hand position and tuck elbows. Rolling onto palms: increase fingertip engagement and pause briefly at the bottom.
Warm-Up and Mobility
Do wrist circles, finger extensions, forearm stretches, plus light scapular push-ups to prep the grip and shoulder region.
Progressions, Variations, and Progressive Overload
From Beginner to Advanced: a Phase-by-Phase Plan
- Phase 1: Fingertip pushups on a high surface (wall/bench) to begin the fingertip pushups progression from beginner to advanced.
- Phase 2: Lower incline; fingertips on the edge, a natural step in progressions to fingertip pushups.
- Phase 3: Floor with knees down to manage finger load while maintaining form.
- Phase 4: Floor on toes for full technique, plus a 1–2 second pause at the bottom.
- Phase 5: If solid, add controlled variations (short pulses or a light unilateral fingertip practice).
Surface and Load Variations (incline/decline, harder surfaces)
- Start on a soft surface; progress to hardwood or tile as grip tightens.
- Use incline to reduce load, then progress to decline to increase finger demand.
- Harder surfaces subtly challenge stability and finger contact.
Equipment Aids for Finger Strength (bands, grip trainers)
- Light finger bands or grip trainers can be used on rest days to add controlled resistance.
- Keep tension comfortable; prioritize smooth, controlled reps.
Managing Progression: Reps, Sets, and Added Load
- Add 1–2 reps or 1 extra set every 1–2 weeks.
- Introduce a bottom pause to heighten difficulty.
- Pair any equipment aid with increases in reps rather than load alone.
Benefits, Safety Protocols, and Sports-Specific Applications
Benefits for Grip, Finger and Forearm Strength
- Fingertip pushups benefits include stronger finger flexors, steadier grip, and greater forearm endurance—useful for sustained holds in grappling or bar work.
- They count as finger strength training that can transfer to sport-specific grips.
Safety Protocols: Warm-Up, Medical Considerations, and Injury Risk
- Warm-Up: quick finger taps, gentle wrist circles, and incline fingertip pushes on a padded surface.
- fingertips pushups technique for beginners: start elevated, progress gradually, and use a soft surface.
- Medical clearance: consult a clinician if you have finger, wrist, or joint issues; stop if pain or swelling appears.
- Injury risk: avoid hard surfaces, increase load slowly, and listen to pain signals to prevent overload.
Sports Applications: Martial Arts and Weightlifting
- Martial arts grips and clinch control can improve with fingertip loading.
- In weightlifting, a stronger fingertip grip supports bar control and plate handling.
How fingertip pushups transfer to sports performance
- A firmer grip and better finger control can translate to longer holds, steadier bar paths, and firmer clinch control.
Frequently asked questions
What is a fingertip push-up?
A push-up performed with weight on the finger pads rather than the palms, demanding finger strength and wrist stability and testing balance.
How do you perform fingertip pushups correctly?
Place fingertips on a firm surface with wrists under shoulders and a straight line from head to heels; keep elbows tucked and press through the pads of the index and middle fingers as you lower with control until your chest hovers, then push back up; if you're new, start on an incline (wall, table, or bench) and progress to the floor as finger strength grows.
Are fingertip pushups safe for beginners?
Yes, but start with a warm-up and a stable surface, avoid soft floors, and only increase load when you can maintain perfect form for several reps; if finger pain or joint discomfort persists, pause and reassess with a qualified coach or clinician.
How can I progress from standard pushups to fingertip pushups?
Follow a phase-by-phase progression: start on a high surface (wall/bench), progress to a nearer incline with fingertips on the edge, then move to floor with knees down, and finally floor on toes with a brief bottom pause. Add reps or sets gradually every 1–2 weeks and only introduce light finger resistance once you can maintain flawless form.
About the authors

Goran Huskić
Co-founder · Professional basketball player
Goran Huskić is a Serbian professional basketball player — a 6'11" center currently playing for Monbus Obradoiro in Spain's Primera FEB. He won the 2019–20 Basketball Champions League with San Pablo Burgos and has competed professionally across Spain, Germany, Lithuania, Serbia and the United States. He co-founded PUSHapp to bring pro-level training discipline to everyday workouts.
Nikola Janković
Co-founder · Former professional basketball player
Nikola Janković is a former professional basketball player — a 6'9" forward and the 2016–17 ABA League MVP — who played for Partizan, Union Olimpija and Mega, among others. Today he runs a pilates studio and gym focused on strength, mobility and overall wellbeing. He co-founded PUSHapp to make consistent, measurable training simple for everyone.